

There are four phases to a properly performed ACT Examination:
- Patient Preparation
The protocol limits the patient's physical presentation and controls examination environment.
- Recording the Images
This involves positioning the patient for three views, assuring the camera is properly focused, and capturing three images.
- Submitting Images for Interpretation
An examination form is completed and images are uploaded to TAS for interpretation.
- Receiving the Findings Report
You'll receive a comprehensive Report of Thermographic Findings via email, typically within twenty-four hours of submission.
Adherence to a strict Pre-examination Protocol enhances the accuracy of the thermographic evaluation. Deviation from the protocol could result in misleading changes in the patient's thermal characteristics. To assure the integrity of the examination it is imperative that influences altering blood flow be avoided. The following summarizes the key points in preparing the patient for the examination:
Patient does not ingest alcohol, stimulants such as coffee, tea, power drinks, etc., within 24-hours of the examination.
- Patient does not smoke cigarettes nor ingest hot/cold beverages within two-hours of the examination.
Serial examinations should always be performed at the same time of day.
Patient thermal equilibration should be conducted for a minimum of ten minutes with the pre-examination/examination room temperature between 68°F - 72°F.
Confirm that the camera is connected to the computer showing a live image, and prepared for recording image snapshots.
Enter "Object Parameters" (emissivity, distance, etc.) and "Recording Settings" (patient's name, etc.).
The ACT Examination requires three images: left and right oblique views of the face and neck and a frontal view capturing the area between the top of the forehead and the area just below the thyroid gland. The frontal view has the patient slightly tipping the head back such that the area over the thyroid is clearly visible.

It is essential to assure the patient's hair is not obstructing or obscuring any part of the face and neck, especially the areas over the auricular and temple regions. A surgical cap or equivalent is suggested.
The image recording procedure is relatively simple, but not without pitfalls that must be avoided.
Maintaining camera calibration and focus while capturing the three different patient views can be easily overlooked. Specifically, the exact distance between the camera and the surface of the patient is a critical parameter for camera calibration. Small changes in camera-patient-distance should not be ignored, because if the camera is not calibrated the ability to properly analyze the images is compromised, and the examination is tainted.
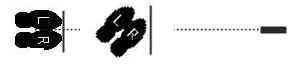
To maintain consistent camera-patient distance, when rotating the patient for the two oblique images it is important that the patient's feet are positioned as shown in the diagram, below. As before, initial alignment is made to a line on the floor marking the camera-patient distance.

Important Details: During rotation for the two oblique images, the back of the rotated heel is placed against the inside heel of the stationary foot. The patient's weight is supported on the stationary foot while the patient stands in a relaxed natural posture.
Impaired viewing and unreliable temperature measurements result when the areas of interest in the image are not in focus. This is a common issue owing to reliance on the camera's automatic focusing mechanism. Unlike breast thermography, the auto-focus feature of infrared cameras is generally suitable for most face, neck and cervical thermography examinations.
The camera should be focused to reveal a sharp image from the tip of the nose when the patient is facing the camera. The camera's 'depth of field' maintains image focus for a few inches behind the focal point, i.e., the entire head is in focus.
When the procedure outlined for positioning the patient is adhered to, the distance between the camera and the patient's subject area remains constant. There is no need to refocus for each patient position.
All cameras suffer a hiccup now and then, which may manifest as a compromised image, or possibly even no image being recorded. (This can happen during the camera's periodic self-calibration process.) Thus, it's necessary to take a moment to view the captured images before submitting them for interpretation. This simple practice assures that the three images submitted are high quality and properly recorded. With these assurances, the images are ready to submit for interpretation.
Submitting the recorded images and examination information required to evaluate the patient for risk is a straight forward procedure. The form, below, is completed for each examination.

Explanation of terms, abbreviations and acronyms:
Risk Factors:
Chronic Hypertension – Patient has medical history of chronic high blood pressure
Cig. Smoker – Patient currently (within three years) smokes (inhales) cigars or cigarettes
Heredity – Family history of heart attacks or strokes
Ethnicity – Check box if patient is of African descent
Abd. Obesity – Abdominal obesity
History:
Diabetes – Patient has medical history of diabetes
Heart disease – Patient has medical history of heart disease including infective endocarditis, mitral stenosis, or recent large myocardial infarction
Atrial Fibrillation – Includes cardiac arrhythmia (irregular heart beat) or frequent heart palpitations
Diagnosis of LVH – Left ventricular hypertrophy (thickening of the myocardium (muscle) of the left ventricle of the heart)
Previous TIA(s)
– Patient has medical history of Transient Ischemic Attacks ("mini-strokes")
Once the information above is submitted, the files-selection screen appears:
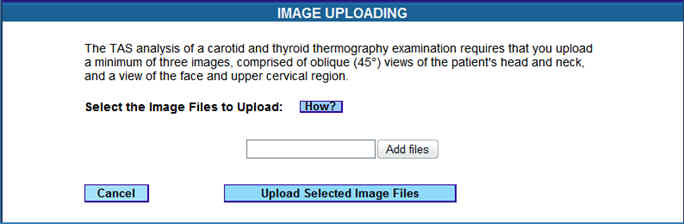
Click 'Add files,' navigate to the folder where your recorded images are stored on disk, and select the images you wish to submit. Then, upload the selected files to for interpretation and reporting by clicking the 'Upload Images' button.
Thermographic Findings Reports are sent via email to the submitting practice, usually within twenty-four business hours of submission. Click here to view a Sample Findings Report.